Fir Needle Simple Syrup

Spring+Douglas+Fir+Tips
 

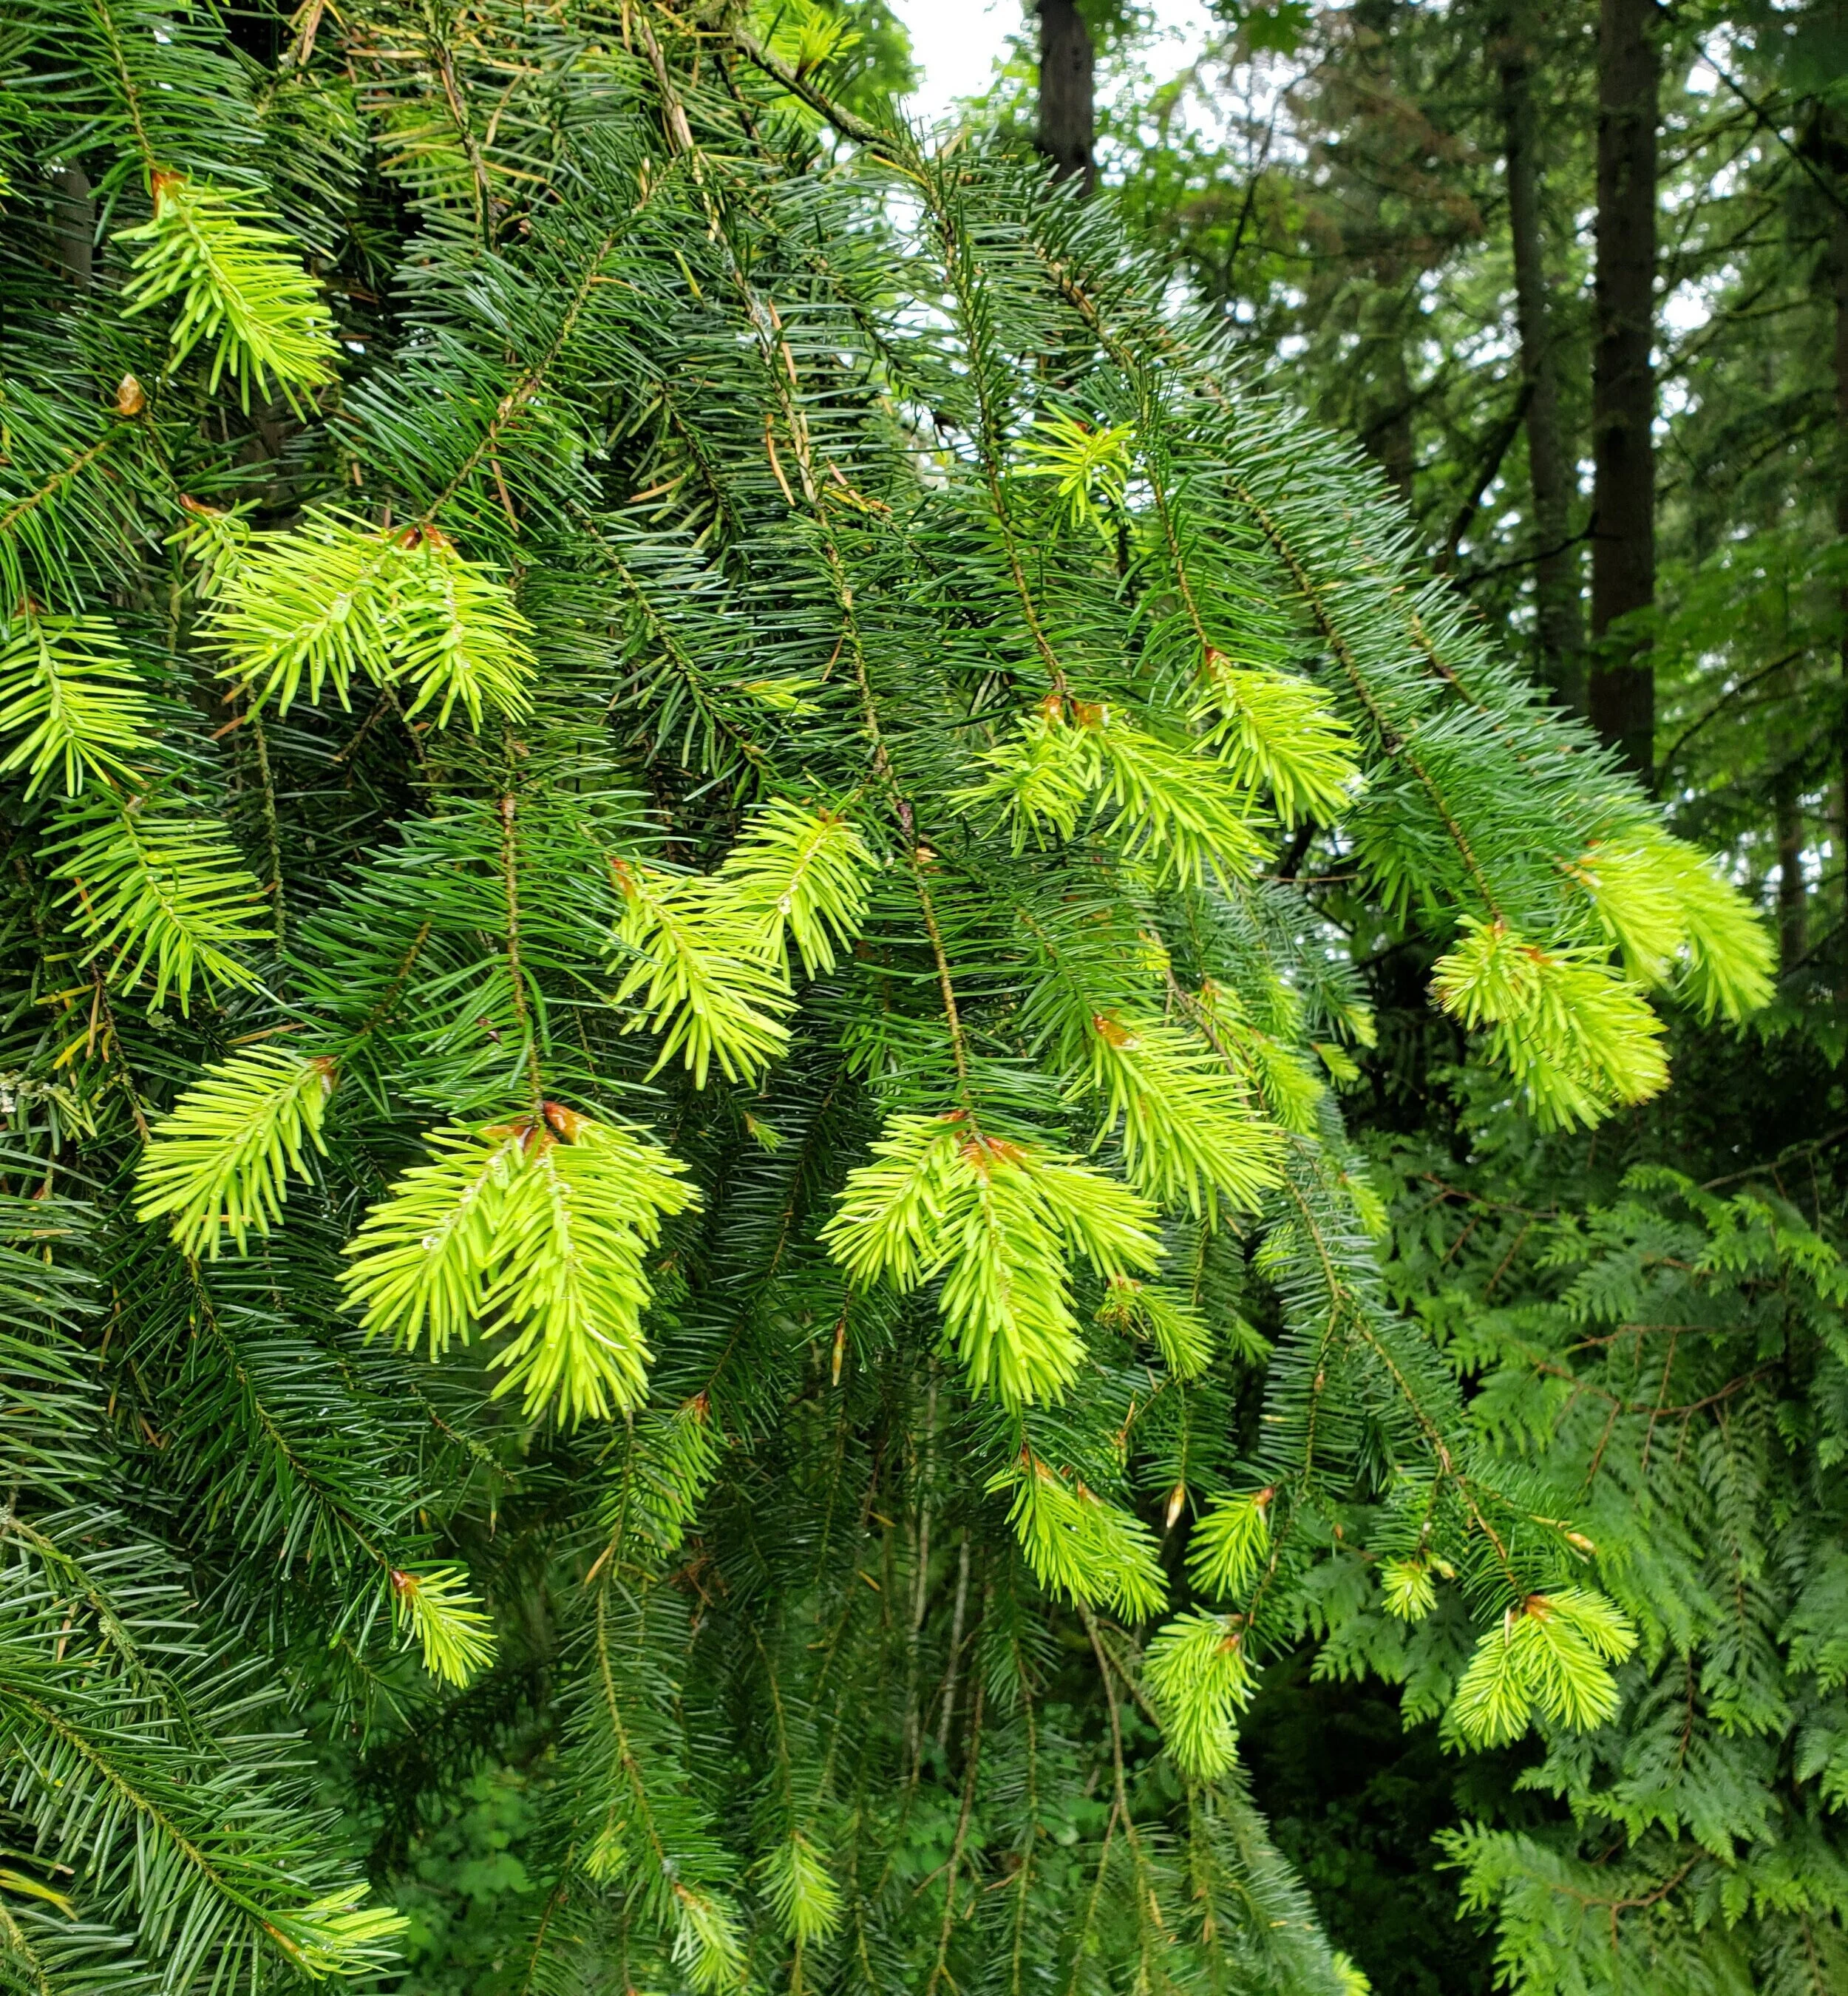
Have you noticed the bright green tips of the fir trees lately? I think they look like decorative tassels adorning these darn green trees. The bright tips are the new, spring growth and in addition to being a different color, they’re much softer than the older needles. They’re also delicious! We often add fir needles to tea when kids and families at our spring and winter programs need to warm up after playing outside in the chilly weather and it’s always a hit, especially with a little sweetener added. But this post is sharing a way to make a sweetener that’s infused with the unique flavor of the Douglas fir needles themselves. The taste is a little citrusy (the needles are packed with vitamin C!) and delightfully woodsy.

douglas fir soda.jpg

Simple syrup isn’t thick like pancake syrup but can be used to drizzle over fruit, as a glaze for cake, a unique topping for ice cream but is best known for its use as a sweetener for drinks. Adding fir needle simple syrup to a glass of carbonated water makes a delicious forest-inspired soda. Because it’s a syrup, it easily mixes with cold drinks. No more stirring granulated sugar around and around in your glass of iced tea before it dissolves. It’s great iced tea and lemonade. I’ve been enjoying it with my hot tea or coffee in the mornings and it lends a little forest flavor to my drink. You can also use it in place of regular simple syrup in your favorite cocktail recipe.

fir needle tips in waldorf basket

The Recipe

Ingredients:

  • young Douglas fir needles

  • water

  • sugar

Gather bright green fir tips in the spring. Be kind to the tree when you’re gathering them! Don’t take them all from the same part of the tree. This is the tree’s new growth and you want to leave some on the tree.

Rinse to remove any stray bugs or dirt.

Put needles in a large pot and cover with an inch or two of water. Bring to a boil then turn off the heat and leave the needles to steep. You can steep them for as long as 24 hours. The flavor will be stronger the longer they steep.

making fir needle syrup.jpg

Strain to remove the needles and measure the remaining liquid.

Return liquid to the pot and add an equal amount of sugar. (Example: If you measured 3 1/2 cups of liquid, add 3 1/2 cups of sugar.)

Bring to a boil and stir until sugar is dissolved. This usually only takes a few minutes.

Let cool and store in the refrigerator. It will keep for about a month.

fir needle simpe syrup recipe.jpg

Canning Simple Syrup

If you made more than you can use in a month, you can can it!

Fill half-pint jars with hot syrup, leaving 1/4 inch headspace. Process in a water bath canner for 10 minutes. Turn off heat, leave in the water bath for 5 additional minutes before removing. Store jars in your pantry for up to a year. This way you can enjoy this taste of the spring forest even in the middle of winter. Fir needle simple syrup also makes a great gift!

doug fir syrup.jpg
 

Nettle Pesto

Stinging nettle (Urtica dioica) may hurt if you brush up against it but it’s a plant packed full of vitamins and minerals - vitamins A, C, K, iron, magnesium, calcium, potassium and more! It grows abundantly across North America and starts coming up in early spring so you likely have some growing near you! They like wet, rich soil and the largest patches here at Cedar Dell are near seasonal waterways and damp areas in the forest.

20200413_163945.jpg
fresh nettle leaves harvest

They have heart shaped, toothed leaves, that grow in alternating pairs along a tall stalk. In early spring the plants are only a few inches tall and I usually discover then when my ankle accidentally brushes against one. They grow to be over 6 feet tall and produce small flowers in the summer. Young leaves taste best so this is a great time of year to harvest them.

stinging nettle close up of hairs.jpg

The stinging nettle gets its name from the hairs that are on the stem and underside of the leaves. When you touch the hairs, they break and release a toxin that causes skin irritation. Some people experience just a mild irritation but others experience itching, stinging, and even blisters. The taste and health benefits of this plant are worth the effort! Wear long sleeves and gloves to harvest them and use tongs when cooking. Heat deactivates the stinging hairs, as does drying the leaves.

Ways to enjoy stinging nettles:

  • Dry leaves and steep in hot water to make an herbal infusion. Kids at our homeschool classes love it mixed with mint and lightly sweetened with honey. Drink it hot or iced.

  • Saute as you would any other tender green, such as spinach.

  • Add leaves to soup or stews.

  • Briefly heat leaves to wilt, then chop and add to your favorite biscuit, bread, or savory muffin recipe.

  • Make pesto to enjoy with pasta, as a sandwich spread, salad dressing, or vegetable dip. Our favorite recipe is listed below!

20200416_172605.jpg

Nettle Pesto Recipe

Ingredients:

  • fresh nettle leaves - approximately one cup, measured after they’ve been blanched*

  • 2 - 4 cloves of garlic

  • 1/4 - 1/2 cup of nuts - pine nuts, cashews, walnuts all work well (We use the higher amount of nuts because our kids love this pesto and the extra protein makes us feel a little better when this is all they eat for dinner.)

  • 1/4 cup parmesan cheese or nutritional yeast

  • Approx. 1/2 cup olive oil

    *it’s hard to estimate the amount of fresh nettle leaves used in this recipe. If, after blanching what you’ve collected, you find you have more or less than one cup , adjust other ingredients accordingly. Exact ratios of ingredients are not critical when making pesto.

Prepare the nettles: Blanching, or flash boiling the nettles will deactivate the stingers. Heat a pot of water to boiling. Using tongs, place one tong-full of leaves into the water and boil for 60 - 90 seconds. Remove and place leaves in a bowl of ice water. Repeat until all leaves have been blanched. Remove from ice water and press between towels to remove as much water as possible.

20200416_164541.jpg
stinging nettle pesto

To make the pesto:

  • Toast nuts in a hot, dry skillet, stirring often until golden. Remove and let cool.

  • Roast garlic by placing in hot skillet and heating until skin becomes charred. This mellows the sharp flavor of the garlic. Let cool, then remove cloves from the skins.

  • Add nettles, nuts, garlic, and parmesan (or nutritional yeast for dairy-free pesto) to blender or food processor.

  • Add oil a few tablespoons at a time and puree until you reach your desired consistency. For a dip or sandwich spread you may only need a few tablespoons of oil, while using closer to 1/2 cup will make a thinner pasta sauce.

  • Enjoy it right away or refrigerate in an airtight container.

nettle pesto recipe.jpg
 

Dutch Oven Bread - a quick and easy recipe!

This bread is a fan favorite when we bake it at summer camp. It doesn’t need a lot of attention so we can start it, go play in the forest for a while, and then come back to bake it. It only needs to rise once so we can finish it all, from measuring out the ingredients to polishing off the last slice, all within the three hour time frame of our family homeschool programs. It’s always a winner!

We bake it outside over coals but it works equally well in the oven. I’ve including our outdoor cooking method at the end of this post. Give it a try! It would be a great addition to your meals when you’re camping.

063_cedardell_180808.jpg

The Recipe

Ingredients:

  • 1 cup warm water (We use the hottest water we get from the faucet)

  • 2 1/4 teaspoon (or 1 packet) yeast

  • 1 tablespoon sugar

  • 3 cups flour

  • 1 teaspoon salt

  • 1 tablespoon oil - any kind

Combine warm water, yeast and sugar in a small bowl and set aside. Let it sit for 5 - 10 minutes. It should start to bubble ant look frothy - this is a sign that the yeast is working.

Measure flour and salt into a large bowl. Add yeast mixture and stir to combine.

Turn out onto a floured surface and knead until is it smooth and elastic. Form into a ball.

Coat a clean bowl with oil. Place dough in bowl and turn until all sides of the dough are coated with oil. This prevents it from drying and cracking as it rises.

Cover loosely with clean towel or plastic wrap and let rise in a warm place for 45 - 60 minutes. (The beautiful indigo-dyed dishtowels pictured in this post can be found in our shop!)

Place on lightly oiled baking sheet and score top with a knife if desired.

Bake at 400 for 20 - 25 minutes. (Alternative outdoor cooking method is described below.)

dutch oven bread recipe
20190815_132808.jpg

If you can wait, it’s best to let it cool a little before eating. We love it with butter and honey or jam but it’s delicious plain as well!

20190808_144826.jpg

Dutch Oven Outdoor Baking

Baking this bread outdoors in a dutch oven takes a little more time than indoors but it’s really not hard. To bake this bread outdoors you will need:

  • cast iron dutch oven cooking pot with a lid

  • charcoal

  • firepit, barbecue grill, or other safe space to heat up charcoal

  • fireproof cooking area - we use an area lined with cinder blocks and concrete pavers

  • metal tongs

  • charcoal chimney, optional

032_cedardell_180808.jpg

A note about the dutch oven you use: It needs to have feet on the bottom so that it is raised off of the ground an inch or so. It should also have a lip around the edge of the lid, as you can see in this photo. This will keep the hot coals (that you’ll place on top) where you want them and prevents ashes from spilling into the pot when you lift the lid.

20181011_131323.jpg

Using a charcoal chimney, if you have one, heat the charcoal. The chimney helps them heat up quickly. I usually start heating the coals 15 or 20 minutes before I expect the dough to finish rising. You want the coals to be nice and gray when you’re ready to bake the bread.

When the bread is ready to be baked, transfer it to the dutch oven.

Using metal tongs, place 10 - 12 coals under the dutch oven and 15 - 17 on the top.

In an indoor oven, heat cooks food from all sides, unlike a stovetop where the heat comes only from the bottom. By placing coals on the bottom and top of the dutch oven, it is truly turning the cast iron pot into an oven and the bread will bake evenly. I find the top cools faster since it has more exposure to the air so I always place more coals on the top than the bottom. Another thing to consider is that the dough is touching the bottom of the pot, while there is space between the dough and the coals on the lid.

20181011_131500.jpg
034_cedardell_180808.jpg

To check to see how the bread looks, carefully use tongs to lift the lid. Take care to keep lid level so ashes don’t fall onto your baking bread! It should start to look golden after about 20 minutes. I find it usually takes about 30 minutes to cook but the cook time is less consistent with this method than in an indoor oven. Check it periodically and once it’s developed a nice golden color and feels somewhat firm to the touch, it’s done!

This loaf would have been perfect with a few more minutes of cooking. Sometimes it’s hard to make the kids keep waiting so we eat it a little early but it’s still delicious.

20190808_144348.jpg

You can see that the crust is more developed on this loaf. This one is perfectly baked!

062_cedardell_180808.jpg
 
dutch oven bread.jpg
 

Pin this image to save it for later and let me know if you try baking it outside!

Maple Blossom Fritters

56611740_2403273373236455_4073590701445611520_o.jpg

Last year we started off our Spring Homeschool session with making these delicious maple blossom fritters. This week would have been our first spring class of the year and we are really missing having our students here! Since we can’t share this tasty snack together, perhaps you have a maple tree near you that’s in bloom.

Here in the Pacific Northwest, bigleaf maple trees are abundant and their flowers are appearing at just this time of year. They can be eaten straight off the tree (always check for insects first!), pickled, or sauteed, but my favorite way to enjoy them is to turn them into crispy fritters.

Tip: Last year our students’ taste testing determined that blossoms that have not fully opened up taste the best. The flowers in the photo above are beautiful, but a little past the prime eating stage. They’re still just fine to eat but if you find flowers like those in the basket below, choose them. See how the pistils and stamens are still mostly contained in the cup-like shape of the petals? That’s what you’re looking for.

56158094_2403984576498668_2741885780073906176_n.jpg

To make the fritters:

1. Mix the following ingredients together in a large bowl. It will make a thin batter.

  • 1 cup flour

  • 1 Tablespoon corn starch

  • 1 teaspoon baking powder

  • 1 cup water

2. Fill a pot with a few inches of the oil of your choice and heat to about 375 degrees. I don’t usually monitor the temperature but test to see when it’s hot enough by dropping a small about of batter in. If it sizzles and turns golden brown, your oil is ready!

3. Dip blossoms in batter. Use a spoon or fork to turn them so they’re fully coated.

4. Carefully place in the hot oil and fry until they’re golden brown.

5. Drain onto a paper towel or rack. Dust with sugar and enjoy them right away.

20190404_134705.jpg
20190404_143642.jpg

One thing the kids always agree on - more powdered sugar is always better!

20190404_143701.jpg
maple blossom fritters recipe(1).jpg
 

Hint: Want to save this recipe for another time? Pin this image so you can find it later! Hover over it (or any photo) and a PInterest button will appear.